-
[Unity Firebase] Unity WebGL REST API를 통한 Firebase 데이터베이스 구현2023년 11월 24일
- 유니얼
-
작성자
-
2023.11.24.:37
728x90Unity에서 REST API를 사용하는 이유
Firebase SDK는 Unity에서 다양한 서비스를 쉽게 통합하기 위한 완전한 SDK를 제공합니다. 그러나 이 SDK는 스탠드얼론 Unity 빌드(Windows, MacOS, Linux)에서 사용할 수 없습니다. 또한, Firebase Unity SDK의 데스크톱 지원은 베타 기능이므로 게임 개발 중에만 사용되며 공개 코드에 적합하지 않습니다. 이런 이유로 Unity에서 Firebase를 활용하려면 REST API를 사용해야 합니다.
Unity와 REST API를 이용하면 Firebase 데이터베이스의 다음 기능들을 구현할 수 있습니다:
- 데이터베이스에 사용자를 게시하는 기능
- ID를 사용하여 데이터베이스에서 사용자를 검색하는 기능
- 데이터베이스에서 모든 사용자 및 그 ID를 검색하는 기능
여기서 REST API란?
REST API는 Representational State Transfer의 약자로, 웹 상의 자원에 접근하는 방식 중 하나입니다. 이는 HTTP 프로토콜을 기반으로 하는데, 이는 인터넷에서 가장 널리 사용되는 프로토콜입니다.
REST API는 주로 웹 서비스에서 데이터를 전송하거나 받는데 사용됩니다. 이를 통해 다른 서버에 있는 데이터에 접근하거나, 원격 서버에 있는 데이터를 수정하거나 삭제할 수 있습니다.
REST API의 특징은 다음과 같습니다:
- Stateless: 각각의 요청이 서로 독립적으로 관리됩니다. 즉, 이전 요청이 이후 요청에 영향을 미치지 않습니다.
- Client-Server 구조: 클라이언트와 서버는 각각의 역할이 확실히 구분되어 있습니다. 클라이언트는 사용자 인터페이스와 관련된 업무를, 서버는 데이터 저장 및 처리 등의 업무를 담당합니다.
- Cacheable: 클라이언트는 응답을 캐시할 수 있습니다. 이를 통해 서버의 부하를 줄일 수 있습니다.
이러한 특징들 덕분에 REST API는 웹 상에서 데이터를 교환하는데 있어 가장 효율적이고 편리한 방법 중 하나로 인정받고 있습니다.
Unity에서 REST API를 구현하기 위해서는 다음 에셋 및 도구가 필요합니다.
https://assetstore.unity.com/packages/tools/network/rest-client-for-unity-102501
Rest Client for Unity | 네트워크 | Unity Asset Store
Get the Rest Client for Unity package from Proyecto 26 and speed up your game development process. Find this & other 네트워크 options on the Unity Asset Store.
assetstore.unity.com
https://github.com/jacobdufault/fullserializer
GitHub - jacobdufault/fullserializer: A robust JSON serialization framework that just works with support for all major Unity exp
A robust JSON serialization framework that just works with support for all major Unity export platforms. - GitHub - jacobdufault/fullserializer: A robust JSON serialization framework that just work...
github.com
이 에셋 및 도구를 이용하여 Firebase 데이터베이스에 업로드할 사용자 객체를 생성하면 Firebase를 효과적으로 활용할 수 있습니다. 이렇게 REST API를 이용하면 Unity에서 Firebase의 다양한 기능을 활용할 수 있으며, 특히 데이터베이스 기능을 이용하여 사용자 정보를 관리하는 등의 작업을 할 수 있습니다. 이를 통해 게임 개발이나 다른 애플리케이션 개발에서 데이터 관리를 효율적으로 할 수 있습니다.
참고 자료 링크 입니다 :
https://medium.com/@rotolonico/firebase-database-in-unity-with-rest-api-42f2cf6a2bbf
Firebase Database in Unity with REST API
Integrate a Firbease Realtime Database in Unity apps using REST APIs
medium.com
REST API로 Firebase 데이터베이스 연동 구현하기
STEP 1 : USER DataClass 구현하기
Firebase 데이터베이스에 업로드할 데이터를 저장하는 User class를 작성합니다.
using System;

/// <summary>
/// The user class, which gets uploaded to the Firebase Database
/// </summary>

[Serializable] // This makes the class able to be serialized into a JSON
public class User
{
    public string name;
    public string surname;
    public int age;

    public User(string name, string surname, int age)
    {
        this.name = name;
        this.surname = surname;
        this.age = age;
    }
}
STEP 2 : FireBase URL 연동하기
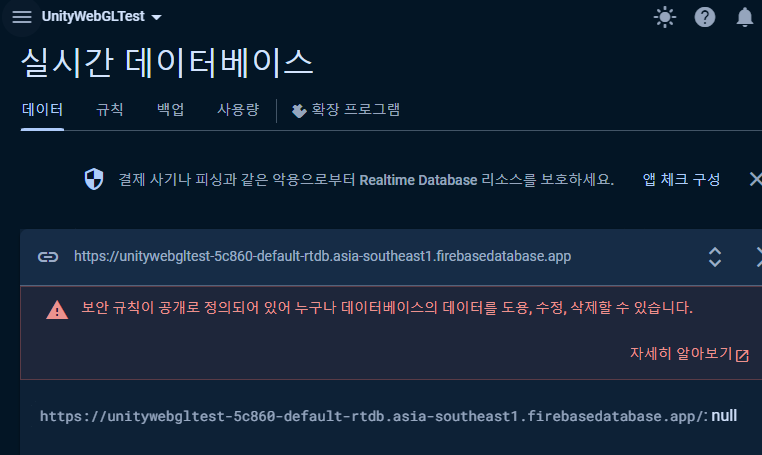
Firebase에 연결해봅시다 아직 하지 않았다면, 새로운 Firebase 프로젝트를 만들어주세요! 프로젝트에 들어가면 툴바에서 '데이터베이스'를 클릭하고 보안 규칙이 테스트 모드인 실시간 데이터베이스를 생성하세요. 그런 다음에 데이터 베이스의 규칙에서 Read,Write를 true로 설정하고, 실시간 데이터베이스의 URL 링크를 복사하면 됩니다.


1) DataBaseHandler.cs 구현하기
이제 실제 데이터 베이스와 연동하는 DataBaseHandler 클래스를 생성합니다. 그리고 위에서 만든 실시간 데이터베이스 URL을 작성합니다.
using System.Collections;
using System.Collections.Generic;
using UnityEngine;

public class DataBaseHandler : MonoBehaviour
{
    private const string databaseURL = "https://unitywebgltest-5c860-default-rtdb.asia-southeast1.firebasedatabase.app";

    // Start is called before the first frame update
    void Start()
    {

    }

    // Update is called once per frame
    void Update()
    {

    }
}
2) PostUser, PutUser 함수 구현하기
PostUser 함수를 작성할 차례입니다. 이 함수는 데이터베이스에 새로운 사용자를 업로드합니다. 함수는 업로드할 사용자를 매개변수로 받고, 이 사용자를 나중에 데이터베이스에서 검색할 수 있도록 식별하는 userId도 받습니다. 위에서 링크된 RestClient Asset을 사용하여 Put 요청을 수행할 것입니다.
using Proyecto26;
using System;
using System.Collections;
using System.Collections.Generic;
using UnityEngine;

public class DataBaseHandler : MonoBehaviour
{
    private const string databaseURL = "https://unitywebgltest-5c860-default-rtdb.asia-southeast1.firebasedatabase.app";

    private void Start()
    {
        User user = new User("Unial",100,20);

        PostUser(user,"Post Player");
        PutUser(user,"Put Player");
    }

    /// <summary>
    /// Adds a user to the Firebase Database
    /// </summary>
    /// <param name="user"> User object that will be uploaded </param>
    /// <param name="userId"> Id of the user that will be uploaded </param>
    public static void PostUser(User user, string userId)
    {
        RestClient.Post<User>($"{databaseURL}/users/{userId}.json", user);
    }

    /// <summary>
    /// Adds a user to the Firebase Database
    /// </summary>
    /// <param name="user"> User object that will be uploaded </param>
    /// <param name="userId"> Id of the user that will be uploaded </param>
    public static void PutUser(User user, string userId)
    {
        RestClient.Put<User>($"{databaseURL}/users/{userId}.json", user);
    }


}
Firebase 데이터베이스에서 다음과 같이 표시됩니다.

요청 처리 시간은 연결 속도에 따라 달라질 수 있으므로, 요청이 언제 완료되는지 정확히 알아두는 것이 좋습니다. 다행히도, RestClient에는 이를 해결할 수 있는 간단한 방법(.Then() 사용)이 있습니다. 이를 이용하면, PostUser 함수를 호출하는 사용자가 요청 완료 후에 수행할 작업을 결정하는 것이 가능하도록, 함수의 매개변수로 대리자를 포함시킬 수 있습니다.
using Proyecto26;
using System;
using System.Collections;
using System.Collections.Generic;
using UnityEngine;

public class DataBaseHandler : MonoBehaviour
{
    private const string databaseURL = "https://unitywebgltest-5c860-default-rtdb.asia-southeast1.firebasedatabase.app";

    public delegate void PostUserCallback();
    public delegate void PutUserCallback();

    private void Start()
    {
        User user = new User("Unial",100,20);

        PostUser(user, "Post Player",() => Debug.Log("PostUser"));
        PutUser(user,"Put Player", () => Debug.Log("PutUser"));
    }

    /// <summary>
    /// Adds a user to the Firebase Database
    /// </summary>
    /// <param name="user"> User object that will be uploaded </param>
    /// <param name="userId"> Id of the user that will be uploaded </param>
    public static void PostUser(User user, string userId, PostUserCallback callback = null)
    {
        RestClient.Post<User>($"{databaseURL}/users/{userId}.json", user).Then(response =>
        {
            callback?.Invoke();
        });
    }

    /// <summary>
    /// Adds a user to the Firebase Database
    /// </summary>
    /// <param name="user"> User object that will be uploaded </param>
    /// <param name="userId"> Id of the user that will be uploaded </param>
    public static void PutUser(User user, string userId, PutUserCallback callback = null)
    {
        RestClient.Put<User>($"{databaseURL}/users/{userId}.json", user).Then(response =>
        {
            callback?.Invoke();
        });
    }
}
2) GetUser, GetUsers 함수 구현하기
이제 정반대의 작업을 수행해 보겠습니다. 특정 userId를 가진 사용자를 검색하는 Get 요청입니다 .
public delegate void GetUserCallback(User user);
/// <summary>
/// Retrieves a user from the Firebase Database, given their id
/// </summary>
/// <param name="userId"> Id of the user that we are looking for </param>
/// <param name="callback"> What to do after the user is downloaded successfully </param>
public static void GetUser(string userId, GetUserCallback callback)
{
    RestClient.Get<User>($"{databaseURL}/users/{userId}.json").Then(user =>
    {
        callback(user);
    });
}
.Then ()은 이제 이미 역 직렬화된 객체인 User를 매개변수로 갖게 됩니다 . 이를 함수 대리자의 매개변수로 사용할 수 있습니다 .
이제 데이터베이스의 모든 사용자를 가져오는 함수를 만들어 보겠습니다. 그 전에 Firebase 실시간 데이터베이스의 데이터가 어떻게 구성되어 있는지 생각해 보겠습니다 . JSON에서 다음 사용자 목록을 살펴보겠습니다 .
{
  "users": {
    "Put Player": {
      "age": 20,
      "name": "Unial",
      "score": 100
    },
    "Put Player1": {
      "age": 20,
      "name": "Unial1",
      "score": 100
    },
    "Put Player2": {
      "age": 21,
      "name": "Unial2",
      "score": 200
    },
    "Put Player3": {
      "age": 23,
      "name": "Unial3",
      "score": 200
    }
  }
}
이 JSON은 사용자 컬렉션을 나타내며 각 사용자는 고유한 식별자(userId)와 연관된 데이터(나이, 이름, 점수)를 가지고 있습니다. C#에서는 이 JSON이 userId를 키로하고 User 객체를 값으로하는 Dictionary<string, User>에 매핑됩니다. User 객체는 나이, 이름 및 점수를 포함합니다.
불행하게도 Unity의 내부 직렬 변환기는 이러한 복잡한 객체를 직렬화하는 데 충분하지 않습니다 . 이것이 바로 위에 링크된 외부 라이브러리인 FullSerializer를 사용해야 하는 이유입니다. 이를 염두에 두고 모든 사용자를 검색 하는 함수를 작성해 보겠습니다 .
public delegate void GetUsersCallback(Dictionary<string, User> users);
private static fsSerializer serializer = new fsSerializer();\

/// <summary>
/// Gets all users from the Firebase Database
/// </summary>
/// <param name="callback"> What to do after all users are downloaded successfully </param>
public static void GetUsers(GetUsersCallback callback)
{
    RestClient.Get($"{databaseURL}users.json").Then(response =>
    {
        var responseJson = response.Text;
        // Using the FullSerializer library: https://github.com/jacobdufault/fullserializer
        // to serialize more complex types (a Dictionary, in this case)
        var data = fsJsonParser.Parse(responseJson);
        object deserialized = null;
        serializer.TryDeserialize(data, typeof(Dictionary<string, User>), ref deserialized);
        var users = deserialized as Dictionary<string, User>;
        callback(users);
    });
}
첫째, 대부분의 경우 우리는 전체 사용자 분기를 다운로드하기 때문에, 요청 URL에 userId가 더 이상 필요하지 않습니다.
둘째, 다른 함수들과 달리, 이제 결과를 내부적으로 역직렬화하지 않습니다.
다시 말해, 결과는 더 이상 <User>가 아니라 응답 객체입니다. 그렇기 때문에, 요청에서 검색할 response.Text 매개변수는 일종의 JSON이 됩니다.
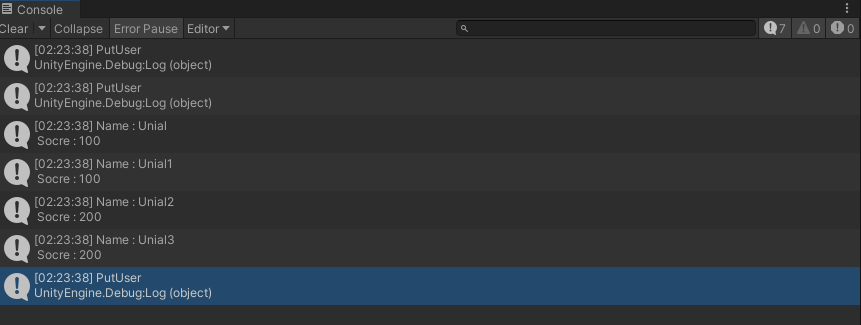
최종 코드는 다음과 같습니다:
using Proyecto26;
using System;
using System.Collections;
using System.Collections.Generic;
using Unity.VisualScripting.FullSerializer;
using UnityEngine;

public class DataBaseHandler : MonoBehaviour
{
    private const string databaseURL = "https://unitywebgltest-5c860-default-rtdb.asia-southeast1.firebasedatabase.app";

    public delegate void PostUserCallback();
    public delegate void PutUserCallback();
    public delegate void GetUserCallback(User user);
    public delegate void GetUsersCallback(Dictionary<string, User> users);

    private static fsSerializer serializer = new fsSerializer();

    private void Start()
    {
        PutUser(new User("Unial1", 100, 20), "Put Player1", () => Debug.Log("PutUser"));
        PutUser(new User("Unial2", 200, 21), "Put Player2", () => Debug.Log("PutUser"));
        PutUser(new User("Unial3", 200, 23), "Put Player3", () => Debug.Log("PutUser"));

        GetUsers((users) =>
        {
            foreach (var user in users)
            {
                Debug.Log($"Name : {user.Value.name}\n Socre : {user.Value.score} \n Age : {user.Value.age}");
            }
        });
    }

    /// <summary>
    /// Adds a user to the Firebase Database
    /// </summary>
    /// <param name="user"> User object that will be uploaded </param>
    /// <param name="userId"> Id of the user that will be uploaded </param>
    public static void PostUser(User user, string userId, PostUserCallback callback = null)
    {
        RestClient.Post<User>($"{databaseURL}/users/{userId}.json", user).Then(response =>
        {
            callback?.Invoke();
        });
    }

    /// <summary>
    /// Adds a user to the Firebase Database
    /// </summary>
    /// <param name="user"> User object that will be uploaded </param>
    /// <param name="userId"> Id of the user that will be uploaded </param>
    public static void PutUser(User user, string userId, PutUserCallback callback = null)
    {
        RestClient.Put<User>($"{databaseURL}/users/{userId}.json", user).Then(response =>
        {
            callback?.Invoke();
        });
    }
    /// <summary>
    /// Retrieves a user from the Firebase Database, given their id
    /// </summary>
    /// <param name="userId"> Id of the user that we are looking for </param>
    /// <param name="callback"> What to do after the user is downloaded successfully </param>
    public static void GetUser(string userId, GetUserCallback callback)
    {
        RestClient.Get<User>($"{databaseURL}/users/{userId}.json").Then(user =>
        {
            callback(user);
        });
    }

    /// <summary>
    /// Gets all users from the Firebase Database
    /// </summary>
    /// <param name="callback"> What to do after all users are downloaded successfully </param>
    public static void GetUsers(GetUsersCallback callback)
    {
        RestClient.Get($"{databaseURL}/users.json").Then(response =>
        {
            var responseJson = response.Text;
            // Using the FullSerializer library: https://github.com/jacobdufault/fullserializer
            // to serialize more complex types (a Dictionary, in this case)
            var data = fsJsonParser.Parse(responseJson);
            object deserialized = null;
            serializer.TryDeserialize(data, typeof(Dictionary<string, User>), ref deserialized);
            var users = deserialized as Dictionary<string, User>;
            callback(users);
        });
    }
}
마무리
이제 Unity에서 REST API를 이용하여 Firebase 실시간 데이터베이스에 연동하는 방법에 대해 알아보았습니다. 이를 통해 우리는 서버에 저장된 데이터에 접근하고, 데이터를 수정하거나 삭제하는 기능을 쉽게 구현할 수 있게 되었습니다.
이 과정에서 우리는 DatabaseHandler 클래스를 만들고, 이를 통해 데이터베이스에 대한 요청을 보내는 방법을 배웠습니다. 또한, 요청이 완료된 후에 수행할 작업을 결정하는 방법에 대해서도 알아보았습니다. 이런 방식은 연결 속도에 따라 요청 처리 시간이 달라질 수 있기 때문에, 특히 중요합니다.
마지막으로, Unity에서 JSON을 역직렬화하여 원하는 유형의 데이터로 변환하는 방법에 대해 알아보았습니다. 이는 우리가 요청을 통해 받아온 데이터를 적절하게 활용할 수 있게 해줍니다.
이러한 지식을 바탕으로, 이제 여러분은 Unity 게임 또는 어플리케이션에 실시간 데이터베이스를 연동할 수 있게 되었습니다. 이를 활용하여 더 풍부하고 동적인 사용자 경험을 제공하길 바랍니다.
반응형다음글이전글이전 글이 없습니다.댓글